1. GIS Information - GIS Predefined Prompting Files and Data Storage
Carlson Field can store GIS information with points collected with total stations, pulse lasers and GPS surveying equipment. When storing field data, Carlson Field can be set to prompt for additional GIS information for each stored point. There are two seperate GIS prompting and data storage methods that can be employed within Carlson Field. The Note File method uses ASCII (.NOT) files. The other method uses Microsoft Access database (.MDB) files. Both methods can use the descriptions of stored points (e.g. SCO for Sewer Cleanout, FH for Fire Hydrant ...), to look for a corresponding GIS prompting file, to prompt and store GIS information. Both the Note File and MDB File methods require creating GIS predefined prompting files prior to collecting field data.
2. Storing GIS Information in Carlson Field
The steps to toggle On GIS prompting and storage for either method ASCII or MDB in Carlson Field are detailed and numbered below:
Step 1) From the main menu pick the Field drop down menu then pick Configure Field.
Step 2) Click on the button GIS Options. This brings up the GIS Options dialog box.
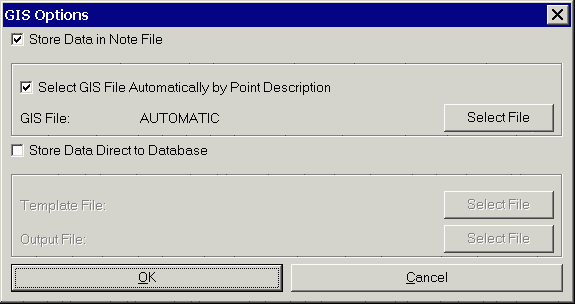
Step 3) The GIS Options pop-up box allows you to choose from the two GIS methods. The two methods are Store Data in Note File (ASCII method) and Store Data Direct to Database (MDB method). These two GIS prompting and data storage methods are decribed fully in the two sections 4 and 5.
When storing points in Carlson Field using Point Store or Auto Points at Interval, you can toggle GIS prompting and data storage on and off by picking Options to access Point Settings->GIS Options.
3. Storing GIS information using the ASCII or MDB method
The recommended method for GIS data storage in Carlson Field is the MDB method. The MDB method stores GIS information directly to a Microsoft Access Database. Only the MDB method can attach digital photographs to points. Carlson Field can create, display, query, input and edit the MDB information. Another important feature that only the MDB method can accomplish is maintaining database connectivity when importing and exporting ESRI Arcview (2D or 3D) shape files.
The ASCII (Note File) method was developed to work with our DOS based data collection package, SurvStar. There are conversion routines to convert between MDB data files and GIS Note files. The only limitation with the ASCII method is that digital photographs cannot be linked to points or entities.
4 Two File Types are used by the ASCII method - GIS & NOT
The two file types for the ASCII method have GIS and NOT file extensions. The GIS files define the GIS prompting and fields. The Note file (.NOT) stores the GIS data for the points.
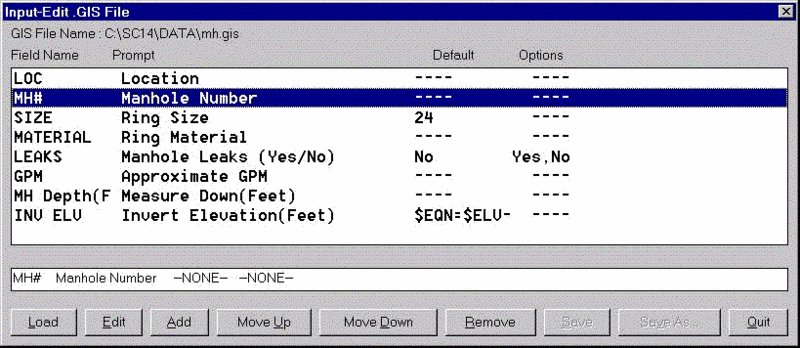
Each GIS file defines the prompting and fields for one GIS feature. For example, MH.GIS could define GIS prompts for manholes including fields like size, depth, condition, location, etc. These GIS files can be created with the Define Note File Prompts command. GIS prompting files are explained fully in section 5C.
One Note file per job is used to store all GIS information. The Note file always has the same filename as the coordinate CRD file, but with a NOT file extension. For example, job5.not would be the file name for the companion note file to job5.crd. Note files for GIS data storage are always ASCII files and are explained fully in section 7, Note File Data Structure and File Creation.
5. Store Data in Note File - ASCII GIS Prompting and Data Storage
The GIS Options button in the Configure Field command brings up the GIS Options pop-up dialog box. It controls GIS prompting and how GIS information is stored in Carlson Field. There are two formats and methods for GIS prompting and storage, ASCII or MDB. Store Data in Note File is the ASCII method. If the ASCII method is selected (checked) you can choose between two GIS prompting methods. The first method is to have one GIS prompting file for all collected points. This method will then have prompting for one type of GIS feature for the points. The second method uses different prompting for every type of point. It looks for a corresponding GIS prompting file to match the description of each stored point. The method to use is set by the Select GIS File Automatically by Point Description toggle.
GIS Data Collection
Page
5A. One ASCII GIS Prompting File for All Collected Points.
Step 1) Pick the check box for Store Data in Note File (ASCII method).
Step 2) Hit Select File. This brings up a pop-up dialog box titled GIS File Name.
Step 3) Choose one GIS filename for prompting. Browse to the drive and subdirectory where the GIS prompting files reside and highlight one. Pick Open to load the selected GIS filename and close the pop-up box. The GIS filename selected should be displayed in the GIS Options dialog pop-up box after GIS File:
This ASCII method will prompt for the same GIS information for every point stored, regardless of description. For example, a FH.GIS (Fire Hydrant) file selection would have the prompting for fire hydrant GIS fields for every point stored.
5B. Select ASCII GIS Prompting File Automatically by Point Description.
Step 1) Pick the check box for Store Data in Note File.
Step 2) Pick the check box for Select GIS File Automatically by Point Description. The GIS file name displayed after GIS File will change to AUTOMATIC. GIS prompting will only appear if the stored point's description corresponds exactly to an existing GIS prompting filename (excluding the GIS extension). For example, if the point description is SMH, then Carlson Field looks for SMH.GIS for the GIS fields. If a point's description has no corresponding GIS file name, Carlson Field briefly displays "No GIS File Found" and continues automatically.
5C. ASCII GIS Prompting File Structure
The .GIS file defines the GIS fields and prompting for one GIS feature. This file is a ASCII file where each line contains a field definition. The definition line has the field name, prompt and default value separated by commas. If the field is a choice of options, the definition line also has each choice separated by commas. If the field's value is to be calculated automatically by an equation, the equation takes the place of the default value. The field's value is calculated automatically once the point is stored or edited. An example ASCII GIS file for Sewer Cleanout GIS prompting (SCO.GIS), is displayed below for a detailed explanation on ASCII GIS prompting file structure.
SCO,SCO (#), ,
SIZE,Size (4/6/8/10/12),4,4,6,8,10,12
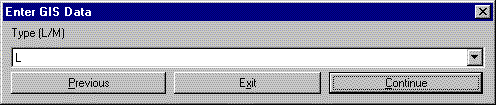
TYPE,Type (L/M),L,L,M
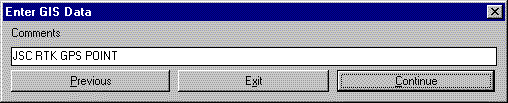
COMMENTS,Comments, ,
SCO.GIS is an ASCII file. It is displayed here as it would appear in
any text editor. Each line in
the GIS file is a GIS prompt in SurvStar and Carlson Field. Each line
consists of four items separated
by commas. The first is Field Name (SIZE). The second is the prompt,
including allowed input
in parentheses and separated by slashes (Size (4/6/8/10/12)). The next
is the default value (4). This
is followed by the allowed values, separated by commas (4,6,8,10,12).
Descriptions for each of the four items and naming conventions for GIS
prompting files are
described in detail below:
Item 1 - Field_Name: Field 1 is never displayed to the operator in Carlson Field. The Field Name is inserted at the beginning of each line in the Note file before the input GIS data. This Field Name corresponds to a column name in a Microsoft Access database table. If you convert GIS ASCII Note data files to MDB tables, the Field Name will become the column name. Converting collected Note files to MDB tables is only an option, not a requirement. The Field Name must be unique for the GIS file and is not allowed to have spaces or special characters.
Item 2 - Prompt: This is the prompt that actually appears when storing ASCII GIS information. It is usually the same name as Field 1 but can include spaces or special characters. Also displayed in the Prompt within parentheses are all allowed input options. Notice the line shown with a prompt SCO (#). The pound sign in parentheses signifies that a number is expected. In the next line the prompt is Size (4/6/8/10/12). When entering GIS information at this prompt only 4, 6, 8,10 and 12 are expected. IMPORTANT: Commas are not allowed within the prompt. All entries in the Prompt should be seperated by a / (forward slash) instead.
Item 3 - Default: The default value is displayed directly after the prompt. If the field operator presses return without entering anything, the default will be stored as this line's GIS information. In the example for SIZE,Size (4/6/8/10/12),4,4,6,8,10,12 the next value after the parentheses is 4. Four will be the default value. If the default space is left blank as in the last line COMMENTS, Comments, , then there is no default value and no value will be saved if the operator doesn't enter anything.
Item 4 - Options: These are the only allowed input options at this GIS prompt. When inputing data, only one of these values will be accepted. So only one of the values 4, 6, 8, 10 or 12 will be accepted as input at the Size prompt. These values are the ones that actually control the input; the options appearing in Item 2 are only there so the operator can see his choices.
GIS Data Collection
Page
6. Creating Prompting Files
The .GIS prompting files can be created by the Define Note File Prompts command. A brief description is included here for all the command options found in the Define Note File Prompts dialog box.
Load brings up a dialog pop-up box titled Specify .GIS File. This dialog box allows you to load an existing GIS prompting file.
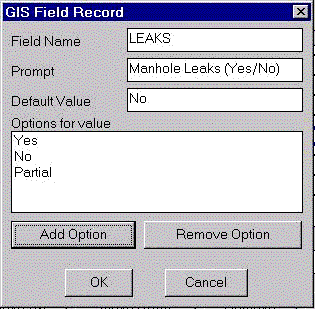
To edit any individual GIS prompting line, highlight that line and pick Edit. The following pop-up dialog box titled GIS Field Record appears. You can input the four items of the prompting file line here. GIS prompting files need to be structured as described in section 5C. Add Option brings up a pop-up dialog box titled New GIS Option. To remove a value in Options for value, highlight the value and pick Remove Option.
To add a GIS prompting line, highlight the line above where you want the new line to go. Pick Add to bring up the pop-up dialog box titled GIS Field Record shown above. Enter in the Field Name, Prompt, Default Value and Options for Values and pick OK. Remember to follow the structure in Section 5C. The newly added GIS prompting line is inserted below the highlighted line.
The Move Up and Move Down buttons change the sequence of GIS prompting.
Remove deletes the highlighted GIS prompting line.
Save and Save As... store the currently loaded GIS
file
to the default name or to a new name.
7. NOT File GIS Data Storage and Structure
Note files (.NOT) store the GIS data for the points . Note files are
created in Carlson Field
automatically when Store Data in Note File is toggled on in
Configure Field->GIS Options. Besides the
GIS data, the note files can also store survey data such as GPS RMS and
PDOP. The survey data to
store in the note file is specified in the Configure Field->Point
Settings command. One Note
file contains all GIS data and Point Store information for all the
field collected points of a job.
These Note files always have the same name as the currently loaded
coordinate file (with a NOT
extention instead of CRD). Note files can contain GIS information,
survey information or both. To view
the note file data, you can open the note file with any text editor or
run the List Points command
and turn on the List Point Notes option.
JOB-001.NOT File with GIS Data Only
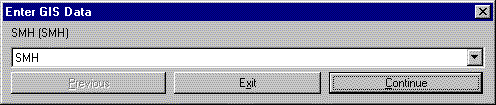
PT_ID:1 GIS_FILE:SMH.gis
SMH,SMH
SIZE,30
TYPE,STND
MANUFACTURER,WOMAK
COMMENTS,SURVEYOR JSC
PT_ID:2 GIS_FILE:SCO.gis
SCO,SCO
SIZE,8
TYPE,M
COMMENTS,SURVEYOR JSC
JOB-002.NOT File with GIS & Survey Data
PT_ID:1 GIS_FILE:SMH.gis
TIME,17:5:6
DATE,2/15/2000
SMH,SMH
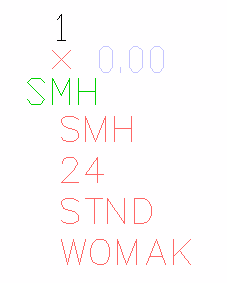
SIZE,24
TYPE,STND
MANUFACTURER,WOMAK
COMMENTS,SURVEYOR JSC
HRMS,0.04
VRMS,0.07
PT_ID:2 GIS_FILE:SCO.gis
TIME,17:6:19
DATE,2/15/2000
SCO,SCO
SIZE,8
TYPE,L
COMMENTS,SURVEYOR JSC
HRMS,0.04
VRMS,0.07
The two examples here show how Carlson Field's Configure Field >
Point Settings > Store Options
can add survey information to the same Note file that
GIS uses.
The section of Note file corresponding to one point starts with a line
showing the point number
and GIS prompting file used. If no GIS prompting file exists, NONE is
displayed. This line is the
point identifier and all GIS and survey data stored below is referenced
to this point number until the
next point line identifier occurs.
JOB-001.NOT File with GIS Data Only Corresponding GIS Prompting (SHM.GIS)
PT_ID:1 GIS_FILE:SMH.gis Using SMH.GIS Prompting File for point 1
SMH,123 SMH,SMH (#), ,
SIZE,30 SIZE,Size (24/30),24,24,30
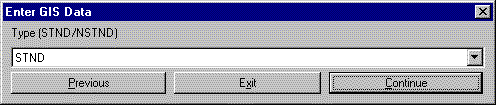
TYPE,STND TYPE,Type (STND/NSTND),STND,STND,>
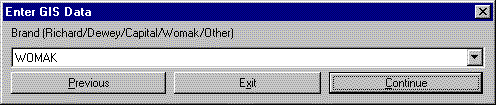
MANUFACTURER,WOMAK MANUFACTURER,Brand (Richard/Dewey/>
COMMENTS,SURVEYOR JSC COMMENTS,Comments,,
PT_ID:2 GIS_FILE:SCO.gis Using SCO.GIS Prompting File for point 2
SCO,78 SCO,SCO (#), ,
SIZE,8 SIZE,Size (4/6/8/10/12),4,4,6,8,10,12
TYPE,M TYPE,Type (L/M),L,L,M
COMMENTS,SURVEYOR JSC COMMENTS,Comments, ,
GIS Data Collection
Page
The second example Note file shown here is for two stored points with
both GIS prompting and
all Store Options survey information toggled on. The user was prompted
to enter the GIS information.
The survey information (shown in italics) was saved automatically
because these options
were toggled on in Configure Field > Point Options.
JOB-002.NOT File with GIS & Survey Data Corresponding GIS Prompting or Store Options Item
PT_ID:1 GIS_FILE:SMH.gis Using SMH.GIS Prompting File for point 1
TIME,17:5:6 >Time/Date in Point Notes
DATE,2/15/2000 >Time/Date in Point Notes
NOTE1,MISC NOTES LINE 1 >Point Notes
NOTE2,MISC NOTES LINE 2 >Point Notes
SMH,78 SMH,SMH (#), ,
SIZE,24 SIZE,Size (24/30),24,24,30
TYPE,STND TYPE,Type (STND/NSTND),STND,STND,>
MANUFACTURER,WOMAK MANUFACTURER,Brand (Richard/Dewey/>
COMMENTS,SURVEYOR JSC COMMENTS,Comments,,
HRMS,0.04 >GPS RMS in Point Notes
VRMS,0.07 >GPS RMS in Point Notes
STATUS,FIXED >GPS RMS in Point Notes
ROD HT,5.250 >Rod Height in Point Notes
PT_DATA,1, 4998.000, 4996.000, 95.000, SMH >Point Coordinates in Notes
PT_ID:2 GIS_FILE:SCO.gis Using SCO.GIS Prompting File for point 2
TIME,17:6:19 >Time/Date in Point Notes
DATE,2/15/2000 >Time/Date in Point Notes
NOTE1,MISC NOTE LINE 1 >Point Notes
SCO,222 SCO,SCO (#), ,
SIZE,8 SIZE,Size (4/6/8/10/12),4,4,6,8,10,12
TYPE,L TYPE,Type (L/M),L,L,M
COMMENTS,SURVEYOR JSC COMMENTS,Comments, ,
HRMS,0.04 >GPS RMS in Point Notes
VRMS,0.07 >GPS RMS in Point Notes
STATUS,FIXED >GPS RMS in Point Notes
ROD HT,5.250 >Rod Height in Point Notes
PT_DATA,2, 4998.036, 4996.091, 95.000, SCO
>Point Coordinates in Notes
8. Point Store - ASCII GIS using GPS
The Point Store command in Field can store nearly unlimited GIS information with field collected points. The following procedure details the steps needed to field collect points with GIS information using the Point Store command and RTK equipment.
Before running this procedure, the following must be setup:
- Run GPS Setup to configure your GPS receiver.
- Run Align Local Coordinates to define the transformation from the GPS coordinate system to your job coordinate system
- Create .GIS prompting files to use with the Define Note File Prompts command.
Step 1 - Pick Point Store in the Field drop down menu.
Step 2 - If no coordinate file (.CRD) has been selected for the current drawing, then Tsunmai will prompt you to load an existing or new CRD file. Pick New to create a new CRD file. For the CRD file name, type in GIS_JOB001 and pick Save to create this new coordinate file.
Step 3 - To toggle on ASCII GIS prompting, pick the Options (F6) button. Then pick the GIS Options at the bottom of the Point Options dialog. In the GIS Options dialog, check on the Store Data in Note File and GIS File Automatically by Point Description toggles. Pick OK to close GIS Options and OK again to close Point Settings.
Step 4 - In the Desc field, type the point description that corresponds to an ASCII GIS prompting file (e.g. SCO for the GIS prompting file SCO.GIS)
Step 5 - Plumb the GPS antenna pole and pick Read (F1) to take a reading from the GPS receiver. The coordinates of the point appear at the top of the dialog box. Pick Store (F2) to store point number 1. (F5 both reads and stores.)
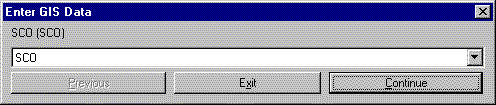
Step 6 - Point Number 1 plots on the screen. Immediately after point 1 plots, the first GIS prompting dialog pop-up box appears. The first GIS item is SCO(#). Enter the number for this sewer clean-out and pick Continue.
The four GIS prompts created in the SCO.GIS file appear as dialog boxes. Directly under the Enter GIS Data title in each dialog pop-up box you can see the GIS prompt including possible values. You can use the up or down arrow keys or pick the down arrow selection triangle to choose the value for each GIS prompt. If no values are shown, you can type any input for that value. Pick Previous or Continue to go backwards or forwards. Exit ends the GIS prompting.
The above procedure stores ASCII GIS information
into one Note file with the same name as the current
coordinate file. Review section 10 to plot, list and edit
Note files in Carlson Field.

GIS Data Collection
Page
9. Point Store - ASCII GIS using Total Station
The Point Store command in Field can store both GIS information and survey information with field-collected points. The following procedure details the steps needed to collect points with GIS and survey information using the Point Store command and Total Station equipment.
Before running this procedure, create .GIS prompting files to use with the Define Note File Prompts command.
Step 1 - Pick Point Store in the Field drop down menu.
Step 2 - If no coordinate file (.CRD) has been selected for the current drawing, then Tsunmai will prompt you to load an existing or new CRD file. Pick New to create a new CRD file. For the CRD file name, type in GIS_JOB001 and pick Save to create this new coordinate file.
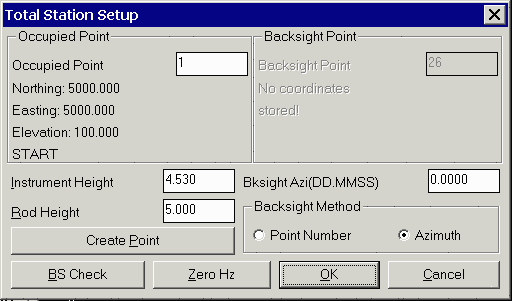
Step 3 - Pick Setup (F3) to bring up the pop-up dialog box titled Total Station Setup. The total station and computer running Carlson Field must be connected by serial cable.
Step 4 - Type in 1 for the Occupied Point. If there are no coordinates for point 1, then pick the Create Point button. In the Create Point dialog, enter point #1, Northing=5000, Easting=5000, Elev=100 and then click OK.
Step 5 - Set the Backsight Method to Azimuth and type 0 (zero) for the Bksight Azi. Input the Instrument Height and Rod Height.
Step 6 - Sight the total station toward an object assumed to be due north. The gun (total station) is zeroed in Total Station Setup dialog box by picking Zero Hz. A Message dialog pop-up box appears and says Done. Check the screen on the total station to see if it is reporting zero for the horizontal angle. If yes, pick OK to close this Message box and OK again to exit the Total Station Setup dialog box. If the horizontal angle has not changed, the total station configuration settings could be wrong. Check that the proper equipment is selected in Configure Field.
Step 7 - To toggle on ASCII GIS prompting, pick the Options (F6)
button. Then pick the GIS
Options at the bottom of the Point Options
dialog. In the GIS Options dialog, check on the
Store Data in Note File and GIS File
Automatically by Point Description toggles. Pick
OK to close

GIS Options and OK again to close Point Settings.
Step 8 - You are ready to collect points from this setup with the total station and prism pole. In the Desc field, type the point description that corresponds to an ASCII GIS prompting file (e.g. SMH for the GIS prompting file SMH.GIS)
Step 9 - Have the rodman setup over the point and sight the point with the total station. Press Read & Store (F5). The total station takes the shot. Point number 1 plots as a sewer manhole.
Step 10 - A group of pop-up dialog boxes appear that are all titled
Enter GIS Data and prompt for
the SMH.GIS GIS information SMH, Size, Type, Brand and
Comments.
10. Plot, List and Edit GIS Notes in Carlson Survey/Field
Note file GIS and survey information can be plotted, reviewed and edited in Carlson Field.
Plotting Note Point Data - The command in Carlson Field that can plot Notes with points is Draw-Locate Points. In the Draw-Locate Points dialog, toggle on (check) Notes.
The Point Numbers toggle in the Draw-Locate Points dialog controls two output formats for plotting Note information. The one shown above is plotted with the point number, point elevation, point description and point symbol. The second format, shown to the right, plots the Note information with point number, elevation and description turned off. The point Note information is plotted with the point symbol only.
Every line of notes is a separate AutoCAD text entity.
Listing Point Note data for Review - To list the current coordinate CRD file, including Note data, pick List Points in the Points drop down menu. Enter the range of points to review or type all to review all points. Pick (check) List Point Notes to display Note data with coordinate points. Pick OK. The pop-up dialog box titled List Points Report appears as shown below. Scroll up or down to review the coordinate points and Note data.
To create a custom report of the coordinate and note data, pick the Use Report Formatter toggle in the List Points dialog. This method will display a list of all the coordinate and note field names and you can choose the order of fields to report from this list. The Report Formatter can also output to Excel and Access.
Edit Coordinate and Note Point Data - The Input-Edit command in Coordinate File Utilites allows you to edit Note data. Coordinate File Utilites is found in the Points drop down menu. From the Coordinate File Utilities dialog, pick Input-Edit Point.
The Edit-Assign Point pop-up dialog box both reviews and edits
coordinate and note data. This
pop-


up box displays only one point's coordinate and note values at a time. To go to a specific point number, type the desired point number and hit Enter. The coordinate and note values are displayed for this point number. To display the next or previous point, pick Next or Previous. To edit any value, pick that box and edit accordingly. To edit note values you must pick the note value and hit enter on the keyboard. This will display the value in the edit box. Edit the note value in this edit box and hit Enter to update this value. If more than three lines are displayed in the Notes area, an up/down scroll bar will appear to the right of this box. After editing the displayed values, selecting Next, Previous or OK automatically stores the edited values. Cancel will exit without storing the displayed edited values. Pick OK to save the edited values and exit.
11. GIS Data: MDB method
To use the Access Database method for storing GIS data, run
Configure Field->GIS Options
and turn on Store Data Direct to Database. This method uses one .MDB
Microsoft Database file as
a "Template File" to create the GIS prompting and a second "Output
File" .MDB Microsoft
Database file to store the GIS information directly into. Despite uses
the MDB file format, this
routine works entirely in Carlson Field and doesn't require Microsoft
Access to be installed on the computer.