Before starting this routine, the SurvStar or
Dozer 2000 program should be in file transfer mode.
In SurvStar, go to File Utilities and choose File
Transfer. In Dozer 2000, go to Transfer and choose
Transfer with Computer.
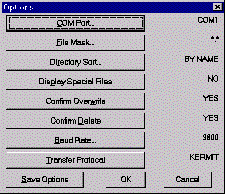
When selecting the routine for the first time the Options dialog will
appear.
From this first popup window, make sure that all of your
communication and transfer settings are correct.
Especially check that your COM Port is set correctly, as
this is the most critical and most often incorrect
setting. If you plan to transfer large files, you
may wish to increase the baud rate setting for
faster transfer. SurvStar will automatically adjust on
the data collector end and reconnect at the new
baud rate. Be sure to click Save Options before
going on so that all settings are remembered the
next time and you can bypass this options screen.
Also, keep in mind that you can always bring this window back
and modify your settings later by clicking the
Options button from the File Transfer
Utility screen.
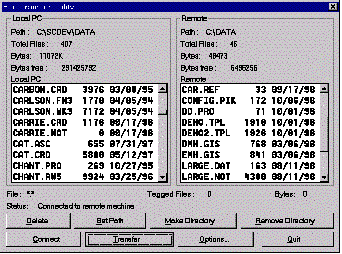
The main screen displays files from your local PC directory on the left and filesfrom your data collector on the right. If you wish to change the directory of either system, click the Set Path button. Select Local PC or Remote, then type in the path name of the desired directory. Click OK. You may also choose to make a new directory or delete an existing directory from either computer by using the Make Directory and Remove Directory buttons. Click on the file you wish to transfer and you will see it highlighted in the screen. You may select multiple files at once by holding the Ctrl key and clicking on additional file names. Once you have highlighted your files, simply click the Transfer button to copy them from one machine to the other. Once the transfer is complete, the Transfer Complete message will appear. If you do not get this message, the transfer was not successful. Check all your cables, COM Port settings and available Disk Space (displayed on the File Transfer Utility screen).
You may also choose to Delete highlighted files. To avoid
accidental deletion of files,
ensure that the Confirm Delete prompt is set to
YES. Finally, when you have finished your
file transfer session, click Quit to return to Carlson.