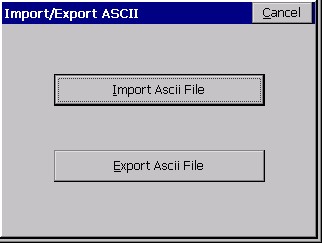
This command allows you to import an ASCII file to job data or export job data to an ACSII file. When you choose this command, you will get a secondary dialog where you choose to Import or Export.
Import ASCII File
This command converts point data from an ASCII text file into the SurvCE format. The source ASCII file can contain any combination of point number, northing, easting, elevation, and description. You may select any of the predefined formats or create your own custom format. Since some of these source file formats (like Carlson CRD and TDS CR5) are not ASCII but are actually ōbinaryö, Import ASCII file can be used to import points from certain non-ASCII type files. This next figure shows the Import Ascii dialog box.
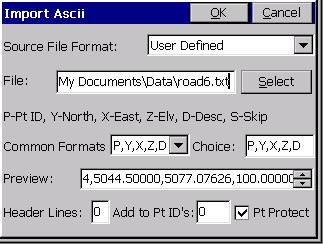
- Source File Format: You must choose the format of the source file. The choices include
User Defined: For importing most .TXT and .ASC files. The coordinate order in the Choice field is used.
Traverse PC: For importing Traverse PC .TRV files.
TDS: For importing TDS .CR5 files. Note that CR5 files can contain point numbers in excess of 32760. If point ID’s exceed that value, it is best to set ōalphanumericö as the point ID type under ōNew Jobö in Job Settings prior to importing.
Geodimeter: For importing Geodimeter .OBS files.
Trimble POS: For importing Trimble .POS files.
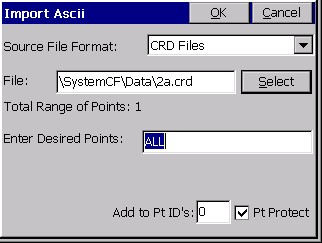
CRD File: Allows importing a SurvCE CRD file into the current, active CRD file, and setting the range of points to import. Note that this method can be used to move a subset of points from one CRD file over to another file, as shown below.
SDR File: For importing point data within Sokkia SDR files.
- File: You must choose the file to import.
- Select: Choose this button to browse for the file name.
- Common Formats: If your Source File Format is set to User Defined, choosing one of these settings copies the contents into the Choice field, which will be used to import the file.
- Choice: If you were importing an ASCII file with a special form (e.g. A,Survey,1254552.123,498135.12,1109.23,iron pin,54) then you want a format the ōskipsö the first two columns (A and Survey) and does Easting (X), Northing (Y), Elevation (Z), Description (D) and Point ID (P), so your format would be: S,S,X,Y,D,P. If there is no point ID in the ASCII file, you simply omit the P in the entered format, and the program will prompt for a starting point number or ID and will number each subsequent point sequentially.
- Preview: Shows you a preview of the first line of the ASCII file. This is helpful in determining the correct coordinate order format.
- Header Lines: Specifies the number of header lines to skip in the ASCII file.
- Add to Pt ID’s: Specifies a value to be added to each point ID during the import process.
- Pt Protect: Specifies whether or not to check each point ID to see if it already exists in the current CRD file. If this is toggled ON and you attempt to import point ID’s that already exist, you will then be prompted to overwrite each existing point or to cancel the operation.
Export ASCII File
This command converts SurvCE point data to an ASCII text file. The next figure shows the Export Ascii dialog box. Choose a coordinate order, type of delimiter, range of points and precision. After choosing the settings in this dialog box, press OK. A standard file dialog will appear. In this dialog, choose a name for your ASCII file and then press OK. After the file is written, a dialog will appear telling you that it is done.
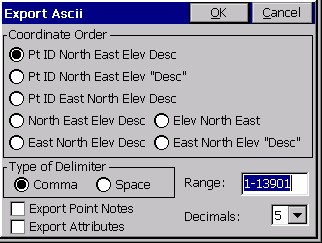
- Coordinate Order: You must specify the output format for the ASCII file. There are seven different formats to choose from. Each can either be space or comma delimited, giving you a total of fourteen choices. Two of the options include quotes around the description field so that your descriptions can include spaces and/or commas.
- Type of Delimiter: You must specify the character used for delimiting the fields in the output ASCII file. You may choose either a space or a comma.
- Range: You must specify the range of points to output. Ranges can be separated with commas, as in 1-40,101-199,A1-A44.
- Export Notes: When this is toggled ON, any point notes associated with the current job will be exported to a .NOT file. These files are used with SurvCADD (and other Carlson office software products).
- Export Attributes: GIS attributes can be assigned to points that are stored based on settings in the Feature Code List. If a point that is shot is a manhole (eg. MH) and attributes such as concrete, 5 rungs, 2 inlets are entered for this point, these attributes will be exported to an ASCII file for use by external programs with this option clicked on.
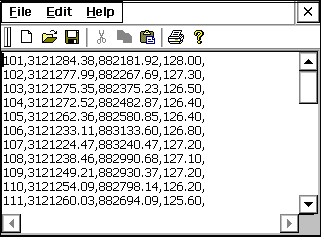
- Decimals: You must specify the output precision for northings, eastings, and elevations. This setting does not affect point ID’s or descriptions. After choosing the settings in this dialog box, press OK. A standard file dialog will appear. In this dialog, choose a name for your ASCII file and then press OK. After the file is written, a dialog will appear telling you that it is done. This next figure shows the result of exporting a job to an ASCII file.