"Sight" Survey (SS76)
Creating a Simple Traverse
Assumptions
This example assumes that you have just installed "Sight" Survey and haven’t made any changes to the configuration. If you have been experimenting with some of the settings in "Sight" Survey’s control panel, your results might be slightly different than those given here. If you have made some changes in the configuration panel, it might be wise to set them back to the default values. If you can’t remember what you changed, don’t worry, your output will just be a little different than what we get here.
Getting around in "Sight" Survey
Almost all of the things you would want to do in "Sight" Survey can be done using only the keyboard, or using only the mouse. Most of the basic commands can be accessed using two letter commands, and all of the commands are available from the pull-down menus.
Using the Menus
For this example we will use the menus to invoke the different commands. This is the easiest way to learn the commands because they are all visible and are grouped into easily understandable categories.
To select a command from the menu, click on the group heading (File, Edit, Points, Lines, ...), then select the command from the pull-down menu. Some of the commands have sub-categories under them. For example, to invoke the distance- distance intersection routine, you would select the Misc. menu, then select Intersections from that menu, then select Dist-Dist Intersection.
Using the Two-Letter Keyboard Commands
Most of the commands can also be invoked by typing a two-letter command. For example, to start the distance-distance intersection routine, simply type "DD" into any one of the text boxes. "Sight" Survey will obediently jump into the Distance- Distance intersection routine. This is perhaps the quickest way around "Sight" Survey, but it requires you to know the two-letter commands.
What to Use, Menus or Commands?
Whether you use the menu’s or the two-letter commands is a matter of personal preference, but probably you will use some combination of the two. Initially it will be easier to use the menu’s, because they are simple and intuitive. As you grow more advanced, you will start to learn the two-letter commands for the routines used most often, but you will probably still use the menus for less common commands.
What we’re going to do.
In this example we will:
-
Enter an initial point of beginning (p.o.b.)
-
Arbitrarily set the coordinates for our point of beginning
-
Traverse to another point.
-
Traverse to another point, knowing a turned angle from the previous point.
-
Traverse around an arc of known arc length.
-
Inverse back to our point of beginning.
-
Calculate the area of the traverse.
Doing it
Creating the traverse
This example is very basic but it demonstrates many of the fundamentals contained in "Sight" Survey.
Setting a starting point
In order to start a traverse we need to set a starting point.
-
Start "Sight" Survey by double clicking on the "Sight" Survey icon.
-
After a few moments to load, a "Did you know?" box may appear with a helpful hint. The amount of time it takes to load "Sight" Survey is dependent on your machine.
-
Under the Points menu, select Start At.
-
"Sight" Survey should change to the start at point routine and automatically enter a starting point number of 1 for you in the first text box. If "Sight" Survey doesn’t automatically enter the point number, you probably have the automatic numbering option turned off. That’s ok, simply type a 1 in the first text box.
-
Press Enter .
-
Since this is a new point, we need to assign coordinates to it. "Sight" Survey will prompt you with an Enter and Assign box. The Point Number text box should have a 1 in it, and the entry in the Northing box should be highlighted.
-
For our traverse we will arbitrarily set the coordinates of the starting point to 10000, 10000.
-
Type 10000 into the Northing box. The text you enter should automatically replace the text in the Northing text box.
-
Press Enter
-
Type 10000 into the Easting box, and press Enter
-
For this example we don’t care about an elevation or a description, so just hit enter on these prompts. You can enter an elevation and description if you would like, but this isn’t graded, so you don’t get extra credit for extra work.
-
"Sight" Survey will print some text about this point in the Text Output window, and a big "1" should appear in the Drawing window.
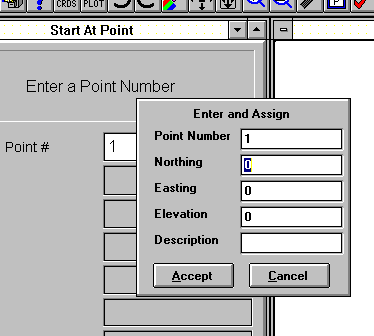
You have now successfully completed the entry of your initial point.
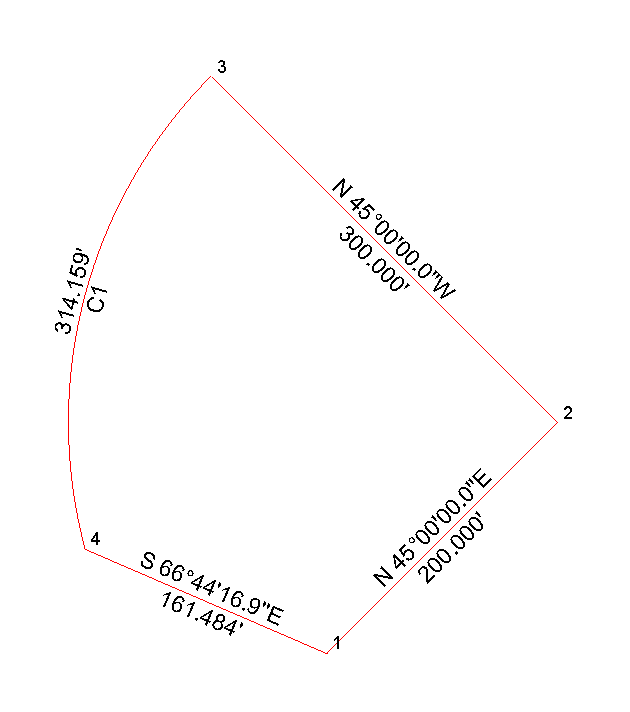
 Traverse to a point
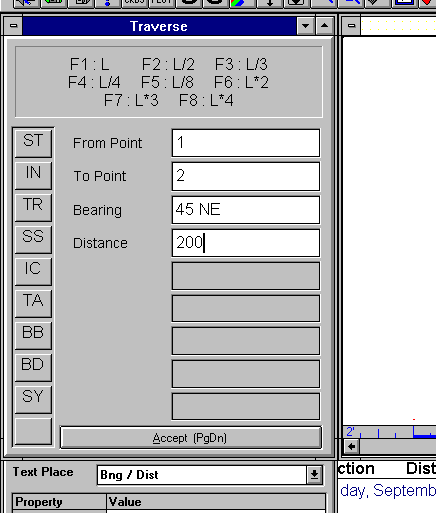
After entering the start at information, "Sight" Survey will automatically switch to the traverse routine. If for some reason you are not in the traverse entry screen now, simply select Traverse from the Lines menu.
-
If you have automatic point numbering on there will be a number 2 in the To Point box, and the cursor will be in the Bearing box. If you don’t have automatic numbering turned on, you will have to enter the 2 yourself, and press Enter
-
In the Bearing box, type 45ne and then press Enter
-
In the Distance box, type 200 and press Enter
After entering the distance and pressing enter, a line will be drawn in the Drawing window from point 1, 45° Northeast, 200 feet to point 2. "Sight" Survey will also print some text documenting the line in the Text Output window, and set up the input window for another leg.
You have now successfully completed the entry of your first leg.
Traverse to the next point
For this leg we will turn an angle 90° right, and traverse 300 feet to point 3.

-
If you have automatic point numbering on there will be a number 3 in the To Point box, and the cursor will be in the Bearing box. If you don’t have automatic numbering turned on, you will have to enter the 3 yourself, and press Enter
-
In the Bearing box, type 90AR and then press Enter
-
In the Distance box, type 300 and press Enter
After entering the distance and pressing enter, a line will be drawn in the Drawing window from point 1, 45° Northwest, 300 feet to point 3. "Sight" Survey will also print some text documenting the line, and set up the input window for another leg.
You have now successfully completed the entry of your second leg.
Save your work
It might be a good idea to save our work now. That way if we make a mistake we can always start again from here.
-
Select the File menu, then select Save from the pull-down menu.
-
"Sight" Survey will ask you for a file name. For this example, lets just call it "Example". Type Example in the text box labeled File name.
-
Press Enter
Your example has now been saved.
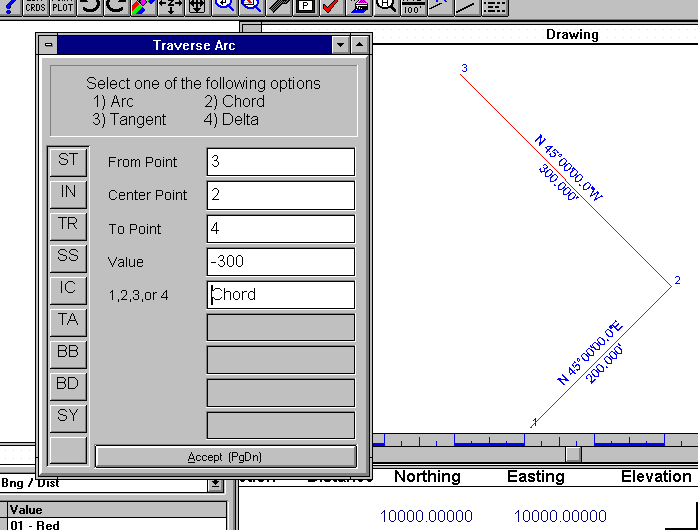
Traverse around an arc.
The next thing we’ll do is traverse around an arc with a 300 foot chord length.
-
Click on the Curves menu, then select Traverse Arc from the pull-down menu.
-
"Sight" Survey’s input window now displays five text boxes that you will need to fill in order to completely describe the traverse.
-
The first box is labeled From Point. This box should already have a 3 in it. If it doesn’t, go ahead and enter a 3 and press Enter to move to the second box.
-
Since this is the first curve we are doing "Sight" Survey can’t make any assumptions about the center point, so this box will be empty. For our traverse we’ll use point 2 as our center point. Type 2 and press Enter
-
If you are using automatic point numbering, "Sight" Survey will automatically enter a value in the text box labeled To Point and the cursor should now be in the text box labeled Value. If this is not the case, simply type a 4 in the To Point text box, and press Enter.
-
Since we want to traverse around an arc with a 300 foot chord it would make sense to enter 300 here. But since we want the arc to be counter-clockwise, we need to enter a negative value. Type -300 and press Enter.
-
In the final text box we need to specify that the value 300 is a chord length. To do this we type chord into the text box. Actually we only need to type C, "Sight" Survey is smart enough to fill in the rest for us. So type C, and then press Enter.
After entering the final piece of data, "Sight" Survey will perform the necessary calculations, place the arc in the Drawing window, document the arc in the Text Output window, and set up the entry window for another arc.
You have now successfully completed the entry of your first arc.
Inversing back to the original point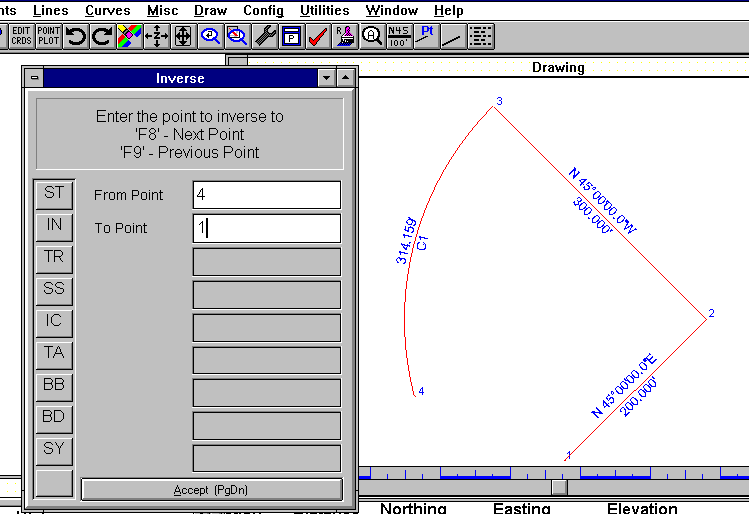
We are now ready to inverse back to the original point.
-
Select the Lines menu, then select Inverse from the pull-down menu.
-
"Sight" Survey will change the entry window so that it is ready to accept your inverse information.
-
The text box labeled From Point should already have a 4 in it.
-
In the To Point text box, type a 1 and press enter.
-
After entering the final piece of information needed, "Sight" Survey will place the line on the Drawing window complete with annotations, document the line in the Text Output window, and set the entry window up for another inverse.
You have now successfully completed the entry of the entire tract.
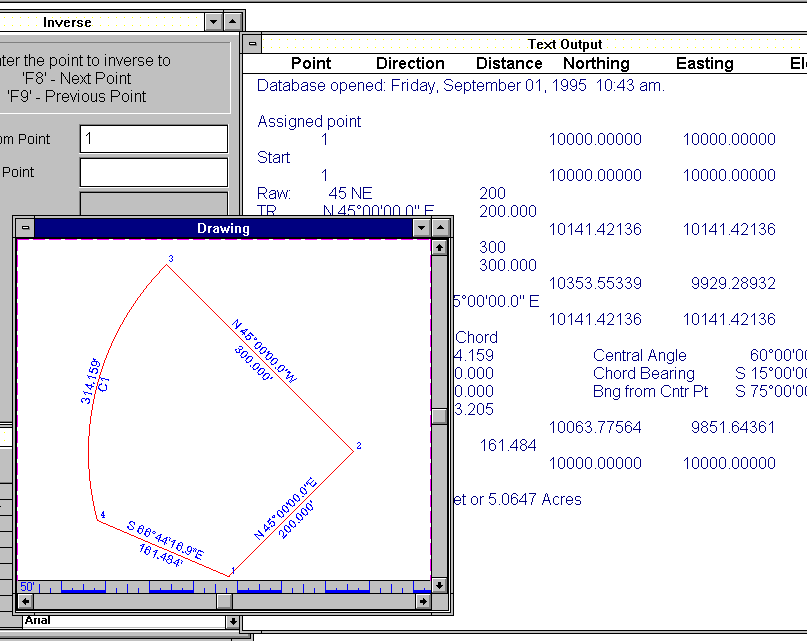
Finding the area of the tract.
To find the area of the tract we just worked our way around, we could now select the Misc menu, then the Area sub-menu, then select Area Printout. But this is probably a good time to try out the two-letter commands. (The command to calculate an area is "AR".)
-
In either the To Point box or the From Point box type AR.
-
"Sight" Survey knows that what you are typing is not a new point but is actually a command so it doesn’t disturb the text already in the text box. Instead, along the bottom of the program there is a status bar. "Sight" Survey displays any commands you enter in this status bar. For example right now the status bar should say "Command : AR".
-
"Sight" Survey should now print a line in the Text Output window documenting the area of our traverse. The line should read "Area = 62123.8898 Sq. Feet or 1.4262 Acres." If yours says something different, you probably just entered a distance differently some where along the way.
-
Now that we have the area calculated, we should save our example again. Simply select the File menu, then select Save from the pull-down menu.
You have now successfully found the area of your first tract.
What we did
While this was a very simple example, we were able to:
-
Set a starting point
-
Traverse a known bearing and distance
-
Traverse a known distance along a bearing determined by the previous leg.
-
Traverse around an arc.
-
Inverse to a known point
-
Calculate the area of our tract.
What’s Next?
This is just a taste of what can be done with "Sight" Survey. The best way to learn more about "Sight" Survey is to experiment. Browse through the menus and see what looks interesting. We hope you like what you see.
© 2008 by Carlson Software, Inc. Last modified November 18, 2008