|
Log Static Data
|
|
Log Static Data
|
This command allows you to log static data to the receiver or a data card (depending on instrument type) for use with Post Processing software.
Post Processing (Logging Static Data) for Novatel/Sokkia Radian/Sokkia Radian IS
Go to the Surv Menu, and click the Log Static Data button. You will see a screen with 3 buttons (see the next figure), or an error message stating that the data collector could not connect to the receiver. If you receive an error message, check connections and the data card.
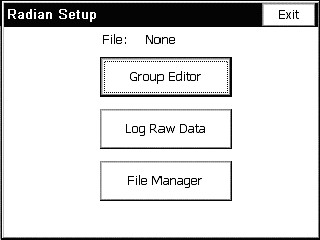
If you want to change the groups you already have on the device, click Group Editor. It will take anywhere from 1-5 seconds to pop up a dialog with group information. This dialog box will be covered later, as it is only necessary for post processing if you have no groups.
Click on the Log Raw Data button to start logging raw data. The documentation continues, assuming you had clicked on this one.
Click on the File Manager button to see what files are on the receiver’s card. Through the dialog box, you see a list of files. If memory is low, you can delete them from this dialog box. This dialog will be covered later.
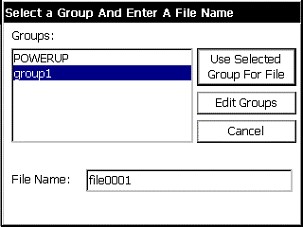
The Log Raw Data dialog box contains a list of groups (or a message that no groups were found), three buttons, and a place to enter a file name. In order to continue, select a group, enter a file name, and click Use Selected Group For File. If you have no groups (or wish to see/change the groups you already have) you will need to click Edit Groups, and add a group, as shown in this figure.
Next is the Tagging Site dialog. To start tagging a site, enter the information requested (site name, site code, optionally change the antenna height (see Changing the Antenna), and whether you want the site to stop automatically (after a duration of your choice) or when End Site is clicked. Click Start Site and all the information entered will be grayed out until the site is ended. Stop the site at any time by clicking End Site. Before ending the site, you will have the option to change the antenna information (in case you made a mistake). View the satellite status at any time by clicking the View Status button. This will not affect the tagging of the site.
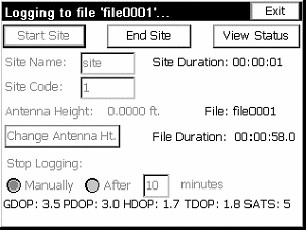
You can tag as many sites as you wish. When you are done, click the Exit button. SurvCE will ask you if you want to continue logging the file. If you do, click yes, and the next time you click Log Raw Data, you will go directly to the dialog box above. The file name will appear in the main Post Process screen if it is being logged. If you wish to leave the receiver logging, you can exit the setup, and the next time you come back to post processing, it will know you are still logging a file.
File Manager
Go to the Surv Menu, and click the Log Static Data button. You will see a screen with 3 buttons, or an error message stating that the data collector could not connect to the receiver. If you receive an error message, check connections and the data card. Click on the File Manager button to see what files are on the receiver’s card. Through the dialog box, you see a list of files.
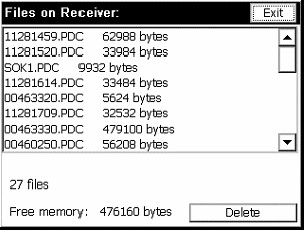
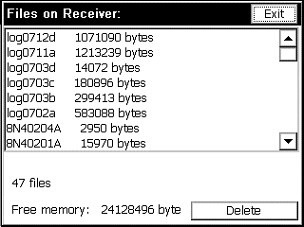
The files are shown with their size. At the bottom of the dialog, the free memory is shown, along with a cancel and a delete button. If you find memory short, you can delete files using this dialog box. To delete a file, click on the file from the list and the delete button. You will be asked if you are sure that you want to delete the file. To exit this dialog, click Exit.
Group Editor
Go to the Surv Menu, and click the Log Static Data button. You will see a screen with 3 buttons, or an error message stating that the data collector could not connect to the receiver. If you receive an error message, check connections and the data card.
If you want to change the groups you already have on the device, click Group Editor. It will take from 1-5 seconds to pop up a dialog with group information.
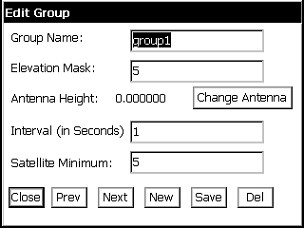
If the Group Name is “NewGroup,” there are currently no groups on the receiver. To add one, fill out the information and click the Save button. If there are already groups, to add a new one, click New, fill out the information, and click Save.
To see other groups, click Prev or Next. To delete a group, click on the Del button.
To change a group, make changes, and click the Save button. If a group name is changed, it may take slightly longer to make the change. In order to change the antenna, click the Change Antenna button (see Changing the Antenna).
When you are satisfied with the groups, click Close. You will be asked if you wish to start logging data. If you click yes, you will go into the Log Raw Data dialogs.
Post Processing (Logging Static Data) for Topcon
Go to the Surv Menu, and click the Log Static Data button. You will see a screen with four buttons.
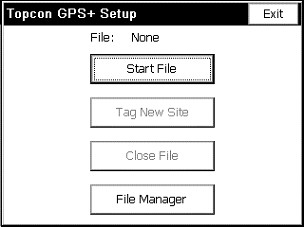
If you want to manage the files (to see how much memory they are using and to delete files) on the receiver, click the File Manager button. Use of the file manager will be covered later. If a file was open, you can now tag sites. Otherwise, open a file by clicking the Start File button.
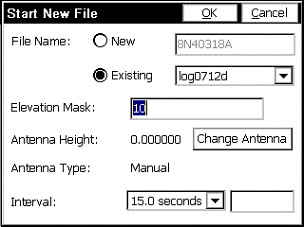
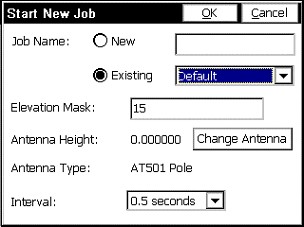
The file name can be chosen from a list of existing file names, using the suggested file name, or a file name of your choice. The antenna height can be changed, as well as the antenna type by clicking the Change Antenna button (see Changing the Antenna). The interval can be selected from the list, or you can enter another one in seconds.
After starting a file, you will be returned to the main screen. From here you can leave the file recording, manage files, exit, or start tagging sites. To tag a site, click the Tag Site button.
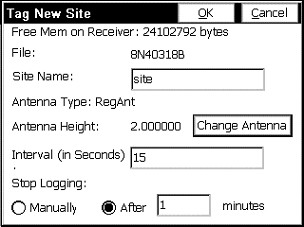
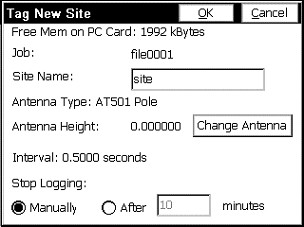
The Tag New Site dialog shows the available space on the receiver, and gives you the ability to enter site name, change the interval, and change the antenna. You can choose to have SurvCE stop logging the site automatically after a certain number of minutes, or stop it manually. Even if you choose to stop it automatically, you will still be able to stop it manually. You will see a screen, press OK.
After you exit this screen (automatically or manually), you will be returned to the main post processing screen. From here, you may tag more sites, close the file, or manage your files.
When you are ready to close the file, hit the Close File button.
File Manager
Go to the Surv Menu, and click the Log Static Data button. You will see a screen with four buttons.
Click on the File Manager button to see what files are on the receiver’s card. Through the dialog box, you see a list of files.
The files are shown with their size. At the bottom of the dialog, the free memory is shown, along with a cancel and a delete button. If you find memory short, you can delete files using this dialog box. To delete a file, click on the file from the list and the delete button. You will be asked if you are sure that you want to delete the file. To exit this dialog, choose Exit.
Post Processing (Logging Static Data) for Leica System 500 GPS
Setting Up Post Processing as a Base
In order to do Post Processing as a base, you must start it when you configure the base. From the Equip Menu select Configure Base, and check the Log Static Data to PC Card checkbox.

Then, go through the Configure Base screens the way you would normally, until reaching a dialog asking for a job name and interval. After entering these, the job will start recording. To end the job, turn off the receiver. Your next job should start up fine.

Setting Up Post Processing as a Rover
From the Surv Menu choose Log Static Data. The data collector will check to see that the receiver is connected and has satellites (if the receiver doesn’t have satellites, no post processing is possible). If successful, a screen with 4 buttons will pop up.
To manage jobs, click the Job Manager button. This will be covered later in the documentation. To start a post processing job, click the Start Job button. Select a job name from the existing jobs, or create a new one. To change the antenna settings, click the Change Antenna button (the functionality of this button will be covered later).
After starting a job, you will be back in the Post Processing menu. Now, you will be able to log points, close the job, or manage jobs.
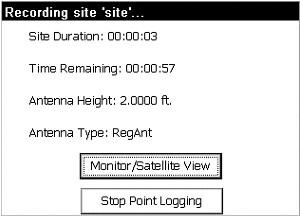
To start logging a point, click the Start Point Logging button. The current job, the available memory, the interval, and the antenna height (which can be changed by clicking the Change Antenna button) are shown. Also, enter a site name, and choose whether to stop logging the point automatically.
This screen shows some information about the point being logged. It can be exited without stopping the point.
After exiting the screen, you will come back to the menu. You can choose to end the job, log more points, or just leave it running while you do other things. To end the job, click the Close Job button.
File Manager
Go to the Surv Menu again and click the Log Static Data button. Again, you will see a screen with four buttons. This time, click on the File Manager button to see what files are on the receiver’s card. Through the dialog box, you see a list of files.

The files are shown with their size. At the bottom of the dialog, the free memory is shown, along with a cancel and a delete button. If you find memory short, you can delete files using this dialog box. To delete a file, click on the file from the list and the Delete button. Also, you can format the card with the Format Card button. This will destroy all the data on the card! Make sure you don’t need any of the data on the card before formatting it. You will be asked if you are sure that you want to delete the file. To exit this dialog, choose Exit.
Changing the Antenna for Post Processing
Clicking on “Change Antenna” from various SurvCE Post Processing dialogs leads you to this dialog. Here, if the antenna height needs to be changes, choose either Vertical Height or Slant Height.
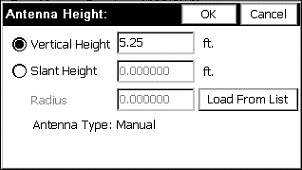
For Vertical Height, click on the radio button for Vertical Height, enter a height, and choose OK. For Slant Height, click on the radio button for Slant Height and enter the slant height. Then, click on Load From List. Choose the antenna and click OK. The radius should be filled in for the antenna. If your antenna is not listed, choose Manual, click OK, and enter the radius in the edit box on the main Antenna Height dialog.
When you are done, click OK. The program will calculate an antenna height if you chose slant height. Antenna height is displayed in the original dialog.
Post Processing (Logging Static Data) for Thales/Ashtech in SurvCE
There are two methods to log static data with a Thales/Ashtech receiver. The first is from the Log Static Data button under the SURV tab of the main menu. The second is using Configure Rover and Configure Base, as described below.
Logging Static Data from the SURV Menu
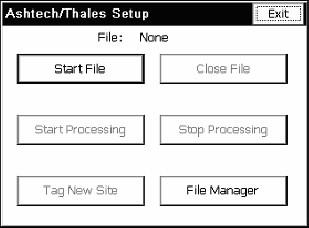
Go to the SURV Menu, and click the Log Static Data button. The result is a dialog with six buttons, or an error message stating that the data collector could not connect to the receiver. If there is an error message, check connections and the data card. From here one can start a file, leave the file recording (exit), manage files, pause recording (stop processing), resume recording (start processing), or start tagging sites. To manage files, see below. If a file is open, but paused, one can resume it.
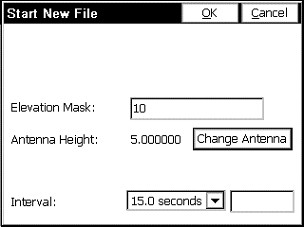
If a file was open, one can now tag sites. Otherwise, open a file by clicking the Start File button. The receiver, based on the names of the last site in the file, chooses the file name. The antenna height can be changed, as well as the antenna type by clicking the Change Antenna button (see Changing the Antenna). The interval can be selected from the list, or one can be entered in seconds in the edit field.
After starting a file, the software returns to the main screen. From here one can leave the file recording (exit), manage files, or start tagging sites. To tag a site, click the Tag Site button.
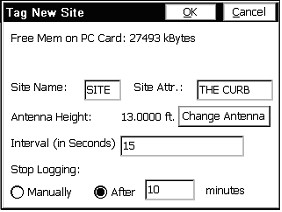
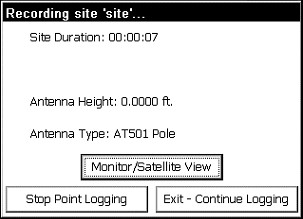
The Tag New Site dialog shows the available space on the receiver, and gives one the ability to enter site name (which must be 4 characters), site attribute, change the interval, and change the antenna height. One can choose to have SurvCE stop logging the site automatically after a certain number of minutes, or stop it manually. Even if automatic is chosen, one will still be able to stop it manually. Press OK.
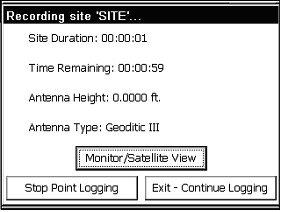
This screen can be exited automatically, by clicking the Stop Point Logging button, or by clicking the Exit-Continue Logging button (which leaves the site running but exits the dialog), returning to the main post processing screen. From here one may exit, tag more sites, manage files, or close the file by clicking the Close File button.
Start Processing/Stop Processing
These buttons pause and resume recording to the file. If the file is recording, Stop Processing will pause the recording. If the file is not recording, Start Processing will resume the file. When the file first starts, it is recording.
File Manger
Go to the SURV Menu, and click the Log Static Data button. There is a screen with six buttons, or an error message stating that the data collector could not connect to the receiver. If there is an error message, check connections and the data card.
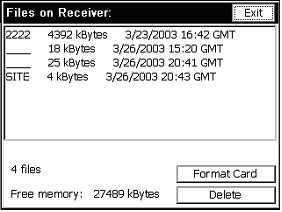
Click on the File Manager button to see what files are on the receiver’s card. The next screen contains a list of files and buttons to delete files or format the data card. The files are shown with their size. At the bottom of the dialog, the free memory is shown, along with a format and a delete button. If memory is short, delete files using this dialog, or format the card. To exit this dialog, click Exit.
To delete a file, click on a file, then on Delete to delete a file. You will be asked if you are sure that you want to delete the file.
Click on Format Card to format the data card. This will erase all the files you have on the card, so be careful.
Thales/Ashtech File Types & Logging Static for RTK Points
The Thales/Ashtech receivers log data into various files on the receiver during Log Static Data. These files are all contained in a U-file, which is what the File Manager will list from the PC Card. When these files are decompressed on the computer intended to do post processing (using the Ashtech Download program), they are split into the following files: an almanac file, a B-file (raw data), a D-file (description and antenna information), an E-file (ephemeris data), and an S-file (session information). D-files are created automatically from the antenna and site information.
SurvCE creates O-files automatically on the data collector from receiver information. The O-file is named the same as the coordinate file name, with an .obn extension, and placed in the data directory. This file is needed for GNSS Studio, as it contains vector information. However, this information can only be added if the point stored has a GPS fixed position.
To store an RTK point into the O-file, go into Store Points with the GPS position fixed. Enter information for point (site id), description (site attribute), and antenna height, and click the A button to store an OBEN average. For every reading taken by GPS Average, an OBEN measurement will be taken to be averaged into the final measurement. The final measurement is stored in the crd file and the O-file on the data collector, as well as the static data files on the receiver.
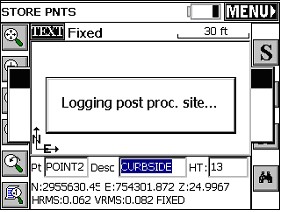
Remember, the file must be recording in order to log static data from Store Points. If a point is stored, and no site is logged, to log one, go to the Log Static Data Menu, select Start Processing, and return to Store Points. It is now possible to log a point from Store Points.
Note: In one reported instance, a damaged “PC card” caused the equipment to display a “Card Full” message. Use the File Manager within Log Static Data to review data on the PCMCIA card in the receiver and use File Manager to re-format the PCMCIA card on the receiver if the card appears to be causing errors. Remove any useful information from the PC card before re-formatting, or install a new PC card.
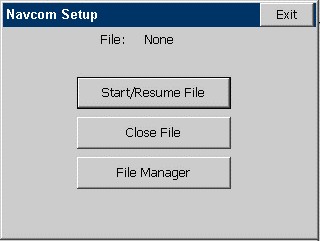
Logging Static Data with Navcom Receiver
The Navcom Receiver supports logging of static data to a file. The files generated with this option can be post-processed to increase the accuracy of your survey using software produced by third parties such as Way Point. SurvCE allows you to turn Navcom static data logging on and off, and manipulate files on the receiver, but you will still need third party software to post-process the resulting files. To begin logging static data, go to the Surv Menu and click the Log Static Data Button. If an error message appears, stating that the data collector could not connect to the receiver, check connections and the data card. You have three choices on the setup screen.
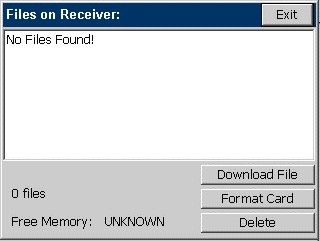
All of the files on the receiver, along with their sizes and creation dates, are displayed in the list. Also, the total memory used is displayed in the lower left corner of the dialog To delete a file, select the file and press Delete File. To download a file to your data collector, select the file and press Download File. To format the MMC data card on your receiver, press format card. Formatting the card will erase all existing data.