|
Point Projection
|
|
Point Projection
|
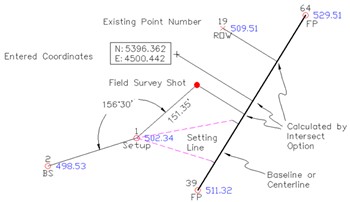
This command allows you to calculate the station and offset of any entered or surveyed point relative to a known centerline or baseline. Note that the Station Store command will calculate a point at a given station and offset. Point Projection does just the reverse — it calculates a station and offset for any given point. But it also will calculate the “Intersect”, or the projection of that offset point on the baseline. This baseline “intersect” or perpendicular projection point can be staked out and stored. The application of the routine is shown below.
The coordinates to project from are entered one of three ways:
The Station and Offset of the point is then calculated, and the Intersect button (see the above figure) will calculate the projected perpendicular intersect point on the baseline. This Intersect can be staked out. Point Projection can be used, crudely, to set line, where you sight a manual total station in a gap in a tree line or row of bushes, and note the station and offset. However, since the offset is perpendicular, the “out” or “in” distance to the desired line will not be along the line of sight, as shown above. The best “set line” method is Point on Line within Stakeout Line/Arc.
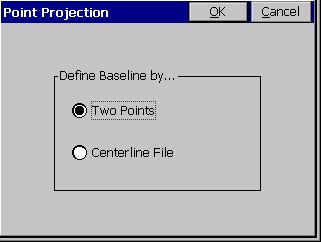
Procedure: You must first define the baseline as shown in the next figure. You can designate the baseline by picking two points on a line or by choosing a predefined centerline file (.cl file).
If you choose Two Points, you must then define the line in the Point Projection dialog box as shown below.
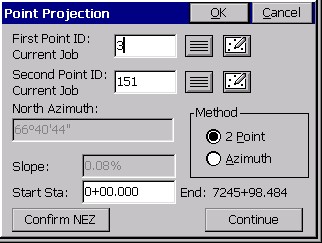
With the Two Points method, you simply enter two point numbers, or choose them from the point list or MAP. The azimuth and slope between them is calculated, along with the ending station, based on the entered start station. With the Azimuth method, you define the line by entering a first point and then entering an azimuth and slope. You can confirm the coordinate values of the points by choosing Confirm NEZ. When the line is defined, choose Continue. You must now define, or designate the point that is offset from the line in the Point Definition dialog box.
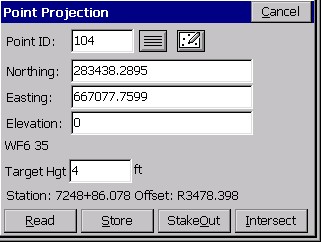
You can enter a point ID, select one from the list, or select one from the map. You can also enter coordinates to define a new point, or read values for a new point. As soon as enough information is entered, the Station/Offset is displayed or the message OFF CENTERLINE is displayed, to let you know that a station/offset cannot be computed for the coordinates entered.
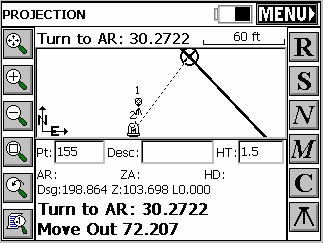
This stakeout screen represents a metric, grads/gons display (400 circle). The target point is 198.864 meters along the baseline, 30.2722 gons angle right from the backsight point 1, a distance of 72.207 meters from the instrument. Point 1 itself was also the offset point used in this example.
Stakeout Note: During stakeout, you will obtain the standard stakeout screen, where option M returns to the previous coordinate screen with the same data shown, and option N returns to the same previous screen with the data cleared, ready for entry of the next offset point.