|
Input-Edit Template
|
|
Input-Edit Template
|
Templates, for roads, levees, ditches and other such earthwork can be created in Carlson Software products such as Carlson SurvCADD or Carlson Roads, or alternately they can be entered in the field using Input/Edit Template. They are used in Carlson SurvCE in the command Slope Staking where the template is one of the design files for slope staking, along with the centerline and the profile. Templates are also used in Template Stakeout (for staking those portions of the road from left shoulder to right shoulder) and for Elevation Difference by Road Design Files. Templates can be reviewed graphically using the command Draw Template. Templates are not necessary for the command Offset Stakeout, found in the Surv menu. In Offset Stakeout, road or other cross slopes from centerline are entered within the command itself.
Currently, SurvCE uses only templates made in SurvCADD or entered directly within SurvCE using the command Input/Edit Template. Every point on a template has an “ID” such as “EP” and “SH” or “CB1”. Templates in SurvCE have only one surface—the surface you are staking. To stake out subgrades, you would enter the surface grade information, then use a vertical offset in Template Stakeoutor enter the subgrade surface directly as a template.
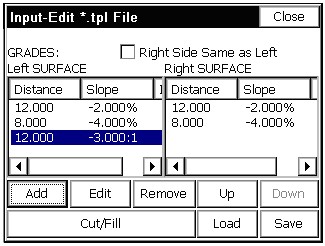
When selecting Input/Edit Template, you are presented immediately with the input dialog, as shown in this figure.
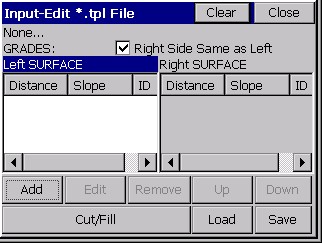
If you are dealing with a symmetrical template, keep the “Right Side Same as Left” clicked on. This will reduce entries by half. Otherwise, you must click into the side you are working on and use Add to add entries, or Edit to revise. One “trick”, if you have non-symmetrical grades, is to keep “Right Side Same as Left” on and enter the symmetrical portion (perhaps the pavement lanes and first shoulder lane), then when you get to the outside shoulder or other “lane” where one side is different than the other, click off “Right Side Same as Left” and complete the non-symmetrical portion of the template. With the Right Side Same as Left clicked off, you can click the actual words “Left SURFACE” or “Right SURFACE” and the left or right columns become active for editing—or simply click into the items in the columns and edit or add.
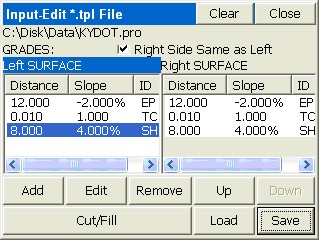
In the curb-and-gutter template shown below, the Add option is used to enter the grade breaks from centerline out to the back of shoulder.
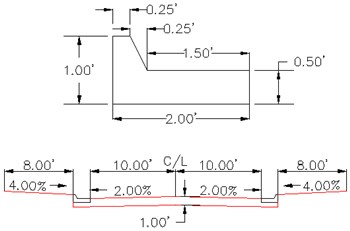
Since templates used in Slope Staking help define all grades into the centerline from the slope stake, it makes sense to focus on the subgrades that are built by the dozer, motor grader or trimmer. Thus, despite all the surface grades involved, there are only three distinct grades in this example curb and gutter template between centerline and the “pivot point” of the cut and fill slopes: 12.00 at -2% (subgrade at back of curb), 0.01 horizontal and 1 vertical, and 8.00 at 4%. For the “vertical” method, some positive horizontal distances must be entered, such as 0.01 or 0.001. By pressing Add in the dialog, we can enter the first 2 grades.
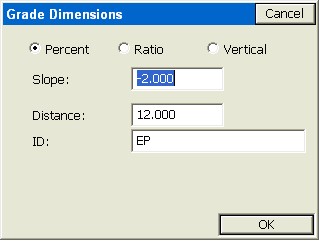
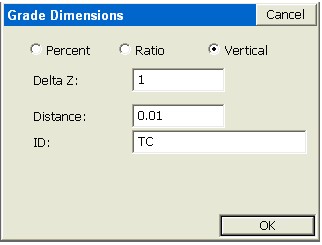
Downhill slopes, going out from the middle of the template, are entered as negatives. Note that it is necessary to enter an “ID” for each break point in the template. This helps identify the description of the grade on the progressive slope stake report (e.g. from the outside going in, 8’ at -4% to TC, 0.01’ at -1 vertical to EP, 12’ at 2% to CL). The shoulder slope going out (8’ at 4%) is entered similarly, as above. The Input-Edit Template dialog now appears.
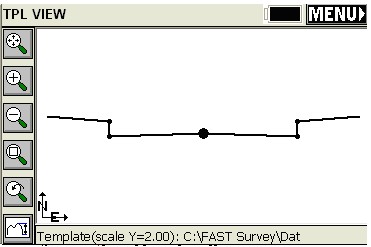
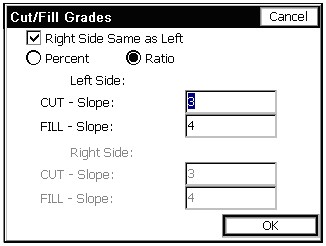
You can press Save any time to save your work. Here we’ve saved and named the template “curb.” Now it is time to enter the Cut and Fill slopes, which are used in slope staking. If the cut slope is 3:1, but the fill slope is 4:1, you would select Cut/Fill above and enter as shown. Distinct left side and right side cut and fill slopes can be defined. After entry of the cut and fill slopes, press OK or Enter to return to the main Input-Edit Template dialog, and press Save. Templates can be drawn using the command Draw Template.
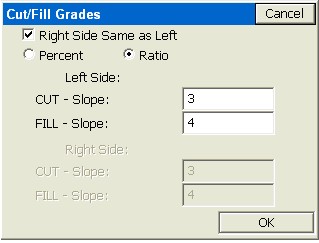
For highway projects or subdivision roads with cut slopes down to a ditch line, 4 template definitions may be necessary for slope staking: (1) Cut Left, Fill Right, (2) Cut Left, Cut Right, (3) Fill Left, Cut Right, (4) Fill Left, Fill Right. Then the appropriate template could be used for any condition. Here is the Cut Left, Fill Right for a 2-slope (pavement and shoulder) road. We will set the fill slope at 4:1 and the cut slope at 3:1.
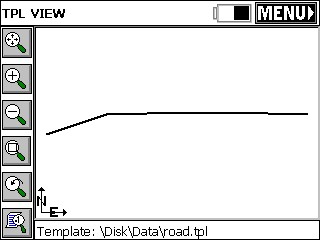
Using this template, cut slopes on the left side of the road will find the pivot at the base of ditch, while fill slopes on the right side of the road will pivot from the edge of shoulder. The template would draw as shown in the next figure, using Draw Template.